Online Sermons
More and more people are turning to the internet for entertainment and information. By putting your sermons online you can provide a resource for your congregation as well as people just browsing the web.
Audio Sermons
Audio only sermons allow most Internet users to listen to your content even if they don't have a fast connection. Many audio formats will allow people to download the sermon and burn it to a CD or put it in a portable MP3 player to listen to on the go.
Generally getting your sermons on the web is a three-step process. First you will need some mechanism to record the sermon. Second you need some way to get put the recording into a digital format and compress it so it can be downloaded quickly. Lastly you will need to upload the compressed files to the web and link to them so they are publically available. We'll look at each of these steps in more detail below.
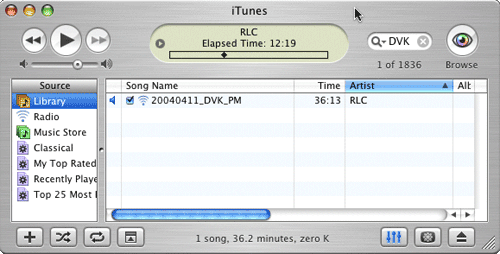
At www.reslife.org we archive many of our audio sermons. They are stored in a database so they can be sorted by topic, speaker, etc. One of our members uses this as a resource as witnessing tool to his un-churched friends. He looks for a sermon on our website on a topic that his friends are struggling with. He downloads the mp3, burns it to a CD and gives it to them.
His friends get a sermon that is about specific issues in their life. This gets the Gospel to them in a way that is uniquely relevant to their situation. Many people don't go to church because they don't see it as being relevant to their lives. A few well picked sermons can switch someone's view of church which can make them much more receptive to the Gospel.

Recording the Sermon
The first step in getting your sermons on the web is to record the sermon. There are several ways to accomplish this. You will need to choose a method that works best in your particular situation. In most cases, if you are currently recording the sermon you will be able to start out by using your existing recordings.
Analog Tape
Most churches are setup to record audio onto a regular cassette tape. Generally this won't produce the highest quality recording, but for spoken audio it is adequate.
A disadvantage of this method is the fact that when you convert the tape into a digital format for the web, you will have to do it in "real time" this means if your sermon is 45 minutes long it will take at least 45 minutes to capture the sermon to a digital format.
CD Recorder
This is probably the best choice because it captures the sermon into a digital format directly to the CD. Using special computer programs you can convert the CD into the files needed for the web without playing through the entire file. This means that instead of playing through an entire 45-minute sermon you may be able to create the file in 8 to 15 minutes depending on the speed of your computer.
Computer
It is possible to record directly to a computer using a sound card. While this is a possibility it generally is better to get separate dedicated hardware like a CD Recorder. Dedicated hardware is less likely to crash during the middle of a recording and it is often simpler to setup and operate.
If you do choose to record directly to a computer, you will need to make sure you have a program that can handle recording the entire sermon into one file. The free recording software that comes with operating systems often has a recording limit of 5 to 10 minutes.
For Windows computers SoundForge Lite is a good piece of software that costs less than $100. It will allow you to record from your sound card and has editing and compression features as well. The full version costs nearly 6 times as much, but the Lite version will probably do everything you need without the added expense.
Another option for Windows computers is a free product called Helix Producer Basic that will let you create Real Media files from a live audio and video source. It is made by Real Networks and includes the ability to stream your service live over the Internet. (www.realnetworks.com)
For Mac users Apple has a free product on their website called Quicktime Broadcaster. It is similar in function to the Helix Producer except is utilizes the Quicktime file format. (www.quicktime.com)
If you are going to use a computer for recording I would suggest going with the SoundForge Lite option, or something similar. Real Media and Quicktime are nice technologies, but will require a more extensive setup process. Also with SoundForge you will be able to export files as MP3s which means they can be listened to on computers, burned to Cds, put on portable devices, etc. With Real Meida and Quicktime, your users will be limited to listening at their computer.
Digital Video
If you record your sermons to digital video, it is possible to extract the audio portion of the sermon for use on the web. While this will take more work than using a CD Recorder, it could be useful if you plan record the sermon on video anyway.

Compressing
The raw audio file from a 30-minute sermon can easily be around 300 Megabytes. This is too big for most people to download from the web. By compressing the file we can get a sermon down to 3 to 5 megabytes. Files of this size can be downloaded from the web in a matter of minutes instead of hours.
Compressing a file uses mathematical formulas to remove bits of sound that the human ear won't miss. If you compress too much the file will start sounding "tinny." Ideally your file should be compressed as much as possible, but not so much that the compression makes it annoying to listen to.
Formats
There are several different types of compressed audio files that you can use. One of the most popular is the MP3 format. The algorithms used to create MP3s are patented, but they are free to use as long as you aren't selling the files.
Most personal computers are setup to play MP3s so this can be a good format to use. Also more and more people are purchasing MP3 players. These are kind of like miniature "WalkMan" type devices that store and play MP3s downloaded from the internet. By putting your files in this format people will be able to listen to them while jogging, driving, etc.
Real Media is another type of file format. Most computers can easily play this format, but it isn't common on portable devices.
Ogg Vorbis is a format that was created when the owners of the MP3 patents decided to start charging. Some day it may replace the MP3 format, but it isn't very common yet. There are some devices that are starting to support it.
Windows Media is the format used by Microsoft. Since most personal computers use some version of Windows it is playable on most PCs. There are several portable devices that play this format as well, but it isn't as prevalent as the MP3 format.
At this point MP3s are probably the best choice because they are fairly easy to create and they seem to be supported on the widest range of devices.
Tools
Sound Forge Lite is a limited verion of the Sound Forge program by Sony. It includes most of the functions for editing audio for less than $100. If you need to manipulate the audio after it has been recorded this is a good option. However if you simply need to encode it for the web, there are several free options that will work equally well.
Free Rip is a small simple program for Windows that lets you convert a CD into mp3 files. It can be downloaded from www.freerip.com. It has the ability to do the very high compression needed for creating voice only files. Some products that are designed primarily for compressing music don't give you the option to compress as much as is needed for voice. Music contains much more information than voice, so compression ratios that will distort music can sound just fine for voice. A typical 3 to 5 minute song will take up 3 to 5 megs of space when stored as an mp3. A 30 minute sermon can be reduced to about the same size using high compression.
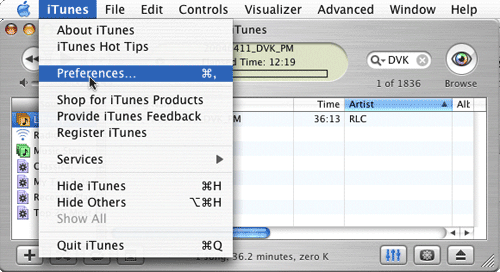
iTunes is freely available for both OS X and Windows from www.apple.com. Using the custom setting allow for various rates of compression in several different formats. Here is an example of the settings we use to encode sermons at Resurrection Life Church.
From iTunes select the preferences menu. This will allow you to change the settings for the program.
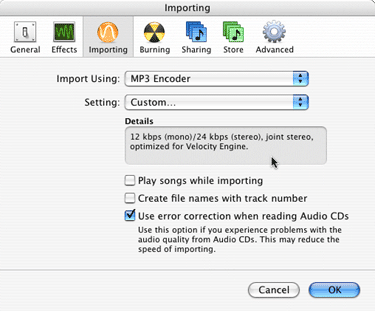
From the preferences window, select the "importing" section. You can choose a number of different ways to import your files. MP3 is the most common format. Selecting Custom in the setting list will allow us to specify exactly the settings we want to use. Depending on your needs, one of the existing settings may work as well.
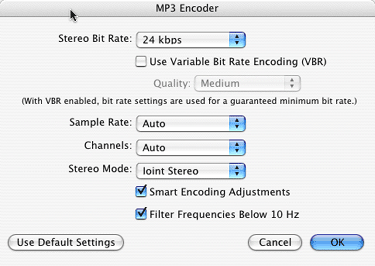
This is where we set exactly how we want the encoder to function. Below are the settings that we use. The stereo bit rate determines the quality (and therefore the size) of the files produced. The Joint Stereo mode tells the encoder to keep from duplicating information in the left and right channels.
You will probably want to experiment with several different settings to see what gives you the smallest file size with acceptable quality. If most of your users have high speed connections, you may want to use a higher quality bit rate. If you are in an area where most people are using dial-up, then you should try to keep the file sizes as small as possible.

Putting it Online
Once you have your file compressed you will need to upload it to your webserver so others can download it. There are several ways to do this, but usually you will use some type of FTP program.
FTP stands for File Transfer Protocol. Programs that implement FTP allow you to connect to a remote server and transfer files to and from your PC.
If you use a program like Dreamweaver or FrontPage to update your web page it will have a built in FTP client that you can use to transfer your files. Otherwise you can use one of the freely available FTP programs. LeechFTP is a good freeware piece of software for FTP.
Once the file is on your website, you need a way to show everyone where it is. Usually this is done by putting a link to the file on a web page on your site. Alternatively you could send out an email with a link to the file. (This might be appropriate for an audio file that you want to share with a small group of people instead of everyone who visits your site.)
Video Sermons
The process of putting video of sermons on the web is similar to what is needed for audio. Video files contain much more information than audio files, so they are much bigger. This means that the time to process, upload and download them are much longer. For example, a 30-minute sermon can be compressed down to 3 to 5 megabytes. A video of the same sermon will usually be 100 to 300 megabytes, depending on what level of quality you use.
even with a fast connection to the web, a 200-megabyte file is going to take a long time to upload.
Another thing to keep in mind is that many people don't have a fast enough connection to the web to watch video from your site. Generally I would suggest that a church start with audio only and make a decision about video based on how many people use the audio version and how many requests come in for video.
If you decide to use video you should be aware that for video clips longer than a few minutes you will want to "stream" the file instead of just letting people download it.
Recording the Sermon
You will need to record the sermon into digital format using a digital video camera. You can also transfer it from regular video tape to a digital tape, but this takes much more time and lowers the quality.
There are several formats of digital video on the market, but the miniDV format is almost always the best choice. The tapes are inexpensive and, more importantly, the hardware needed to work with the tapes is inexpensive.
Capturing the Video
Once you have the sermon on a miniDV tape, you will need to capture it to a computer. Usually this involves hooking your video camera up to the computer using a firewire cable and playing the tape back while the camera "captures" the video.
On the computer you will need some type of software to capture the video from the camera. Most people use simple video editing software for this purpose. Microsoft makes a program called MovieMaker for the PC (http://www.microsoft.com/windowsxp/moviemaker/) and Apple has iMovie for the mac (http://www.apple.com/imovie/). Both of these pieces of software will work well for capturing video.
Compressing the File
The raw video captured from the tape is far to big for use on the web. No one wants to wait 7 days to download a 30-minute sermon. Compressing the video will make the file smaller and will add the information needed to stream the file.
Most video editing programs have options to let you compress and export the files. There are also third party products that will take a file from iMovie or MovieMaker (or other video editing software) and compress it into various formats. Sorenson Squeeze and Discreet Media Cleaner are examples of this type of software.
For long videos you will generally get better results with a third party product. Also some of these programs allow you to batch a many compression jobs together and let them run over night. Since the compression process can take several hours on mid range hardware, this can be a very useful feature.
Putting it Online
Since the files for video are so large, you will want to "stream" them instead of just letting your users download them. Streaming a file means that the user can start viewing it's contents before it is done downloading. Most people wouldn't want to wait for 30 minutes before the video starts playing, but that is exactly what will happen if they try to download the file.
Streaming a file requires that your server be configured for streaming. This means you will need too work with the company that hosts your website to get the files configured correctly. Sometimes hosting providers will require that you put the file on a special server that is configured specifically for streaming. You then link to the streaming server from your main website.
The actual method for putting the file online is the same as that for audio files (see above). Since the video files are likely to be so much bigger, it is wise to do the upload after hours if others are trying to share your internet connection. Uploading a large file can effectively block access to the web for the rest of your office mates. Depending on your connection speed and the size of the file, it isn't uncommon for upload times to be two to eight hours for each 30-minute sermon.