Image Magnification
What is Image Magnification
Image Magnificiation is displaying a live video feed on screens so people can see better. Usually the video feed is of the pastor preaching. In a large sanctuary this can make it a lot easier for people to see who are seated toward the back. However, even for smaller congregations, it can be an effective way to help keep the audience's attention, especially when the display switches between displaying the pastor, the sermon outline and scriptures.
Image magnification is also helpful when doing an object lesson or illustrated sermon because it lets people see what is happening close up regardless of where they are sitting.
Displays
To use image magnification you will need some type of display at the front of the church. Generally the best option is a digital projector. However, if your ceiling is low, you may get better results with several large screen televisions. These can be placed in strategic places so they are visible by people who don't have a very good view of the stage.
If you are looking to purchase a digital projector be sure to pay attention to the lumens. Basically lumens tells you how many units of light the projector is capable of projecting. The higher the lumens the brighter the image. This is offset by the distance your projector is from the screen. The greater the distance from your projector to the screen the less light is concentrated in one place. This means that the further your projector is from the screen the dimmer the image will appear.
Most projectors range from 1000 to 5000 lumens. A 1000 lumen projector is adequate for a presentation for 20 to 40 people in a room that isn't too brightly lit. To project onto a 12 foot screen in a moderately lit sanctuary you should probably start looking for something around 2000 lumens and possibly higher depending on your lighting.
Obviously the amount of light varies from sanctuary to sanctuary, so the only way to know for sure is to try it out. You may want to consider renting a few models before you purchase one. You also may be able to borrow one through a member of your congregation, if they have access to one at work.
Screen
To get a good image, you will need to project onto a white background. For the best results you will want to purchase a screen made specifically for this. The screen can have a lot to do with how bright the image appears. If your projector is bright enough you can fairly good results with a white wall. Just make sure that the wall is as flat and smooth as possible. It is also important that it be as white as possible in order to display correct color.
There are special screens that are designed to handle rear projection. They are thin enough that they let the image show through to the front. This is helpful if you don't have very much clearance in front of the screen for the projector or if there are obstructions that would cast a shadow on the screen if the projector was in the front. To use this type of screen you will need a projector that allows you to project a mirror image. Otherwise the image coming through will appear to be a left to right reverse of the original.
Camera
While most video cameras can be setup to send an image to a screen, the quality of your image is greatly dependent on what type of camera you are using. This doesn't mean you need to buy a $20,000 camera, but there are a few key features to look for.
Most digital video cameras fall into two categories. The first type are the consumer models. These are typically less expensive because they make use of a single CCD. A CCD (Charged Coupling Device) is the part of the camera that is sensitive to light. Since most cameras operate in color they need to sample the light values for red, green, and blue. With a single CCD camera they have to get all three values from the same sensor. It does this by sampling the sensor very rapidly for all three colors.
The second category of video cameras are the professional quality cameras. These use CCDs as well, but they include a separate CCD for each color. This helps give a higher quality image and does a better job of showing color under lower light conditions. Video camera's like this generally start at around $1,800.
Of course the most important measurement isn't how many CCDs are in your camera. The most important thing is how does it look on the screen. The best way to find out is to experiment with several different pieces of equipment. Depending on the lighting in your situation, you may find that an inexpensive consumer camera gives you the results you need.
Making everything work together
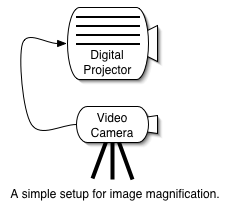
In setting everything up you have to keep in mind the flow of your video signal. In the simplest setup, video will come out of the camera and go into a projector or TV. While this is good for some situations, you will probably want the capability to switch the video feed from the camera to other input devices such as a computer or DVD player. To do this you need some type of mixer or switcher device.
A video mixer can be anything from a manual patch panel to complicated equipment with the ability to do fancy fades and wipes. You can buy a simple 4-input video selector from Radio Shack for less than $40. Basically it takes the feeds from several different video sources (Computer, DVD player, Video camera, etc) and gives you one output. You just push a button corresponding to the device you wish to display on the screen. This will let you jump back and forth between the live video feed and scripture references, or the sermon outline. It also lets you show different media without needing to rewire the whole system.
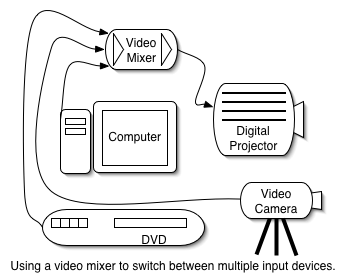
Most cameras come with a special cable that gives you a video and a right and left audio output. You will need to connect this cable into the video camera and into the video switcher. The video switcher then sends its output to the input on the digital projector or TV.